Featuring the models voted Model of the Month by Poole Vikings Model Club members at our monthly meetings. Once the page holds a maximum of twelve models, then the oldest will be replaced by the newest giving a good idea of the contemporary modelling standards being achieved by Club members.
Our Hall of Fame post shows a gallery of single photos of former Models of the Month and other models by our members that have won prizes at our own and other shows.
In normal times, at our own April Show each year we will try to feature the previous twelve models of the month together on the club stand.
Model of the Month for May 2024 is an etched model of RAF Ibsley tower by Henry Goodall

also on table


May photos by Malcolm V Lowe
Model of the Month for April 2024 s a 1/35th Sherman Flail Tank by Martin Crabb


As many Vikings are aware I do like a Sherman and am partial to
Hobart’s Funnies of the 79th Armoured Division. Whilst on a raid to Bovington
Tank Museum I was lucky enough to lay my hands on a 3D printed kit of a
Crab Flail made by Lanmo models, a new Chinese company making 3D
printed conversions and accessories. Having a fair selection of Sherman kits
in the stash, I had the perfect Tasca made Sherman V kit for the build.
Construction of the tank was a simple affair not consuming much time. The
flail on the other hand was a mixture of excellence and complexity. The 3D
printing is wonderful, attached to the frame with tiny mount points.
The etch is very good also and adds great detail. Most of the assembly was
painless the complexity coming from having to cut and assemble 42 equal
lengths of chain and attach them to the roller. Once the two kits were mated
together it was evident it was very front heavy so adding some Masterclub
metal tracks balanced it out perfectly. Painting was commenced with a
primer coat of Mr Hobby black surfacer followed by a base coat of SMS
SCC15 olive drab. Shadows were added by mixing some blue black to the
olive drab and highlights created by adding light stone to olive drab. Decals
were added depicting a vehicle used by 22nd Dragoons in France 1944.
Next, a wash of brown oils picked out the details. This was followed by
some light dust and dirt weathering, all then sealed with a coat of VMS matt
varnish. The tracks were burnished in VMS track black and the raised parts
lightly sanded to show wear. The addition of a simple base elevated the
model giving some context. I shall be building more Shermans for sure.
also on the table


Model of the Month for March is a Revell Schnellboot (E Boat) in 1/72nd scale by Mick O’Dwyer


A great little kit to build in 1/72 scale. There are mines you can add to the kit from CMK, but I just built it as it was. The colours I used were all Revell (Stone Grey, Granite Grey, German Grey and Tar Black).
The figures used were from Revell 02525, and I found that they were not too bad, and relatively cheap.
The rigging was EZ line (fine). On the whole, it was a good kit to build, fits together nicely and also there is a camouflage scheme you can use, but it is very tricky. Thank you for voting for my model.
also on the table


Model of the Month for February is a Wingnut Wings Royal Aircraft Factory Re 8 Built by Mark Turney of Poole Vikings Scale Modellers and completed by Dave Pogson from Romsey Modellers.


Probably an aircraft from 1 Training Squadron RFC/RAF, based at East Boldre in 1918 whilst training U.S.A.S. 93rd. Aero Squadron. Mark did about 80% of the build and almost all the painting, Dave’s contribution included fitting the top wing and all the rigging.
I bought this kit probably in 2015 with the intention of building it myself. I’d built two or three Wingnut Wings but the Re8 was more of a challenge than say their Fokker DVII or Sopwith Pup models. At the time it was issued it had the reputation of being one of Wingnut Wings more complicated and difficult models. In preparation I’d produced some decals of the inverted star fuselage badge and made a new fin. Re8s used for training roles often had new bigger fins.
Chatting to Mark Turney, I discovered he had an ambition to build a Wingnut Wings model. The Re8 was a potential candidate for display at the Friends of the New Forest Airfields Museum and Mark had previously built a beautiful B-26 Marauder for the Museum. I offered him the chance to build the Re8 but also warned him about the level of the build challenge. Mark had painted the model and completed 80% of the build, when he realised he had a developing eyesight issue that realistically would
compromise his ability to finish the model. He returned it to me with the wing struts still to be fitted, the upper wing to be fitted and the rigging to be carried out.
And there is sat, during a busy phase of my life. Then my heart attack and the pandemic put everything even further back. By the time I returned to it I’d developed osteoarthritis in my right hand and knew I
couldn’t finish it either. Poole Vikings doesn’t have a Wingnutters section (though we had several
modellers who build exquisite 1/72nd scale WW1 subjects). Our near neighbours over at Romsey Scale Modellers do have a Wingnutters section and a mighty fine one too. After some negotiation, one of their group, Dave Pogson, agreed to finish the Re8. Dave has built quite a few beautiful Wingnut Wings models and he was highly complementary of Mark’s work. So in December 2023, after 8 years I have it completed, at home and with some hope it would still go to FONFA. I entered the Re8 for model of the month in February 2024, in Mark’s and Dave’s names. Thank you for your votes.
(Update: the model has been accepted for display at the Friends of the New Forest Airfields Museum and will be on display in a few weeks) – John Levesley
also on the table


Model of the Month for January 2024, Revell Eurofighter Typhoon “BARON SPIRIT” 1:48 Scale by Frank Beakhouse


First of all, as a new member of just a few months standing, I would like to say how pleased and honoured I am to receive the first Model of the Month for 2024. The model itself is the Revell 1/48 scale Eurofighter Typhoon “Baron Spirit.” Short history….In 2019 the German Airforce Tactical Wing 71 celebrated its 60th anniversary and had one of its Typhoons painted to commemorate the event incorporating the Squadron’s mascot, Manfred Von Richtofen “The Red Baron.” The aircraft was displayed that season, winning the Best Design Award at the RIAT show at Fairford.
I started the build with the cockpit and ejector seat, both of which were quite detailed. Once finished I glued the fuselage and wings etc. with no real issues. There was some filling to do mainly along the seam just behind the cockpit and underneath forward of the nose wheel. The first stumbling block I came across was that I had decided early that she would be a gear up aircraft but the kit didn’t come with a pilot figure. After a bit of searching the internet, I found a company called PJ Productions who
made resin military pilots for several air forces from different periods. I ordered their 1/48 scale Typhoon pilot that unfortunately needed a few major surgical procedures to get him to sit low enough in the seat to close the canopy. Speaking of which, this was the first part that I had some issues
with. For some reason Revell moulded the canopy with a seam line right down the middle on the outside. Now the canopy is very thin and fragile so I taped up either side of the seam and packed the canopy to support it with blu-tac. Using various grades of paper and Tamiya polishing compounds, I
made good the seam.
By now it was time to paint. I started with a couple of light coats of Tamiya fine grey primer. The kit paint codes were for Revell paint but I was using Tamiya paints, so it was a case of trial and error in mixing various shades of greys, blues and white until I felt I was as close to what photos of the real
aircraft showed.With the painting finished it was onto the most daunting part of the build
and what this model is all about. Namely, the decals. I had sprayed the whole model with gloss varnish to hopefully help and then slowly, over quite a few hours, worked through the sheets. I have to give credit to Revell for the cut and fit of the decals where several had to line up to make a whole.
The only area I had a few moments involving some prayers, swear words and copious amounts of Micro Sol / Set were around the base of the tail fin and over the rear fuselage. In the end I was really pleased with the result. A couple of coats of Plasticote matt from a rattle can and she was all but finished.
She needed some sort of support to set her on. I bought some acrylic rod and made up a base during a lunch break at work from some wood offcuts we had lying around. Finally, a nice build with no real issues and I think the decals and lines of the Typhoon really lend themselves to having her in Flight
also on the table


Model of the Month for December 2023 is a diorama by Raymond Clark entitled “Rusty Bucket Farmyard“.

I won’t go into too much detail on my “Rusty Bucket” farmyard diorama, mainly because so much went into it and I don’t want anyone falling asleep whilst reading our esteemed editors monthly newsletter. When it started, I had no concept of what it was to become. I can blame it all on a tractor. A 1/35 scale model tractor. Having seen some awesome model tractors on display at model shows, I purposed to buy, and build, such a model. The issue surfaced after building the tractor however…namely, what to do with it.
A farmyard seemed the obvious solution, so, after scratching around in my random selection of “possible” bases I decided on a piece of shelving that the diorama was ultimately built on. The shed/workshop was scratch built using various bits of wood for the main structure and corrugated cardboard, painted and weathered, for the roofing. But what is a farmyard without a windmill? So that too was made, scratch built from bits of styrene profiling and sheeting, then painted and rusted to
look old. The reservoir next to the windmill was constructed from modelling clay and then filled with resin tinged with green colouring to simulate stagnant water. Next to the reservoir lies an old rusty bucket and this is where the name, the “Rusty Bucket” farmyard eventually came from
Lots of the other items in the diorama are standard model kits, like the cement mixer, garden walling and pedestrian gate on the left, and of course, Herbie (though the racing stripes and numbers are home-made decals). I built the Series 3 Land Rover pickup (not a standard 1/35 kit) as a fairly late addition. Some may recognise the farmers motorcycle as a WW2 BMW, however, lovingly restored and maintained in it’s current livery by said farmer. Some of the plants are purchased items but a large percentage of them are scratch built, like the willow tree, aloe plants scattered around the yard, the
red-hot poker plant and various other flowering plants. Trying to find suitable figures to inhabit this farm scene (Modelu3D ?)was a nightmare and I eventually had to resort to modifying some figures to suit the era and scenario. Many items have imposed themselves on the diorama as it developed (garage tools, various birds etc.) and many times I have agonised over whether the “Rusty Bucket” farmyard has been finally completed. Alas, I must admit that it may never truly be “finished”. Part of the reason is that I created it as a dynamic diorama. By this I mean, some of the items in it can be moved around and repositioned to portray a slightly different aspect of the yard. In addition, every so often I look at it and come up with a new “necessary” addition. For example, between the dioramas first showing at Yeovil and our December club meeting, various trees were replaced, an old scratch built hand plough added etc. For now though, the “Rusty Bucket” farmyard is boxed up and at rest. For now. Who knows, however, what the mischief of the modelling mind will conjure up for it in the future? Time will tell.
all photos by MARTIN C. also on the table were
The Nights of Ni by Sarah,

Cardboard Zero by Ian T,

Wessex HU5 by Graham Y,

La Legion Spanish Civil War figure by Trevor G

RAM KANGAROO by Martin C

Model of the Month for November 2023 is a 1/35th scale an AIRFIX RAF Austin K2Y Ambulance by Trevor Griffiths
I couldn’t make this meeting so all the photos are by Martin C and Jim S


Once upon a time a company called Gecko brought out a 1/35 scale K2/Y ambulance, probably better known as Katy in the film “Ice Cold in Alex.” I bought the kit and in the stash it went for a rainy day. Since then Airfix brought out the same vehicle not long afterwards. Previous to the ambulance, Airfix had brought out a British 3 ton lorry. I purchased one from the Tank Museum at Bovington. I can honestly say this is one of the best kits I have built. (It is still waiting in the paint shop mind).
This led me to getting the Airfix ambulance as it is based on the same chassis. I did some research on the vehicle and came across some photos of a 1/1 restored one in Royal Navy Blue. I guessed most people would paint the model in the desert scheme, with perhaps a few in the European scheme.
So right from the start I decided to paint it in the Royal Navy Blue to make it different. Just as I thought, the kit went together with no problems.You can get a set of wheels in resin from a company called D.E.F models.They make wheels for various vehicles and have quite an extensive range. They come with a bulge in the tyre to represent the look of the vehicle’s weight. I was tempted, but passed on these in the end.
I went about my usual way of painting. Halfords rattle can (grey) for the primer, Tamiya for inside (buff), and blue for the exterior. I used Mr Hobby gloss rattle can and then used Mig Ammo filters and washes for the weathering, trying hard not to overdo it. Again, another coat of Mr Hobby to seal it all and put the decals on. They didn’t need much time in the water to “lift” from the backing sheet and went in very well. Once dry a coat of gloss to seal them and finally a coat of Mr Hobby rattle can matt varnish to tone everything down. I decided to put the stretchers in the vehicle to show the arrangement and how the height of the top ones were jacked up thus leaving the other two outside the vehicle. The pillow and blankets came from the Red Zebra accessories resin set that were made for the Airfix ambulance. The RN letter decals front-back and on the rear door, were kindly given to me by Ian
Domeney (thanks Ian ). If you are thinking of getting either the Airfix lorry or the ambulance, I can recommend them. You will not be disappointed. I did see some of the ambulances at the show in Telford. Five in British Green, three in the desert scheme, one in light blue?? and one in dark blue
like mine but in R.A.F markings. As for the Gecko kit, that’s now in the capable hands of Greg Lock, waiting to be built I understand.
also on the table


Model of the Month for October 2023 is a 1/72nd scale Roland D11 by Paul Seeley


It’s taken a while to bring this one to fruition even if we ignore the weeks I spent fruitlessly trying to knock the KP kit into some kind’ve shape before this. Earlier this year I spotted an old Pegasus kit at one of the model shows and was immediately struck by how much more delicately it was moulded than KP’s version. A fiver was exchanged and progress resumed (started?) After removing the moulded on wing ribs and a bit of re-shaping of outlines new ribs were re-scribed using a scalpel and then it was a visit to the Cotswold village of Much Sanding for the fuselage to reduce the wall thickness down from Tiger armour plate thickness to something approaching reasonable for an aircraft. After clearing up the mess a completely new interior with floor and bulkheads were scratch-built (luckily cockpits were pretty simple in this era) Once the interior was painted I added a small printed map of the Verdun area
produced in 1917 by Germany! (Taking this scale M’Larky too seriously as usual) Fair to say that the parts didn’t fit terribly well together so after reinforcing the seams much filler and sanding followed. The front of the cockpit/wing mount then needed reshaping etc., etc., but we got there eventually. At
this point I realised that the blob of plastic left over was supposed to be the tailskid and fairing so a bit of time was spent creating a new one from brass, scrap sprue and filler that matched the drawings. After spending a lot of time already I couldn’t face detailing and engine and carving a prop so I searched my references and found a lovely image of a Roland lined up alongside the Albatros’ of Jasta 27 complete with engine and prop blades covering (If left out overnight the dew could warp wooden prop blades so fabric ‘socks’ were often used to protect them). The struts, undercarriage and new fuselage louvre details dealt with using brass wire and strip, files + lots of time. The spreader bar complete with bungee springing cords was the third one that I made and when the model is sitting on its base you can’t even see it – Ah well! Painting was trouble free for once – yippee! (Airbrushed acrylics with artists oil paint weathering since you ask). The original fuselage shell was moulded in two halves and then joined with a fabric strip doped over the join.This seam effect, apparent in photos, was reproduced with some careful masking and a few extra layers of paint. (It’s not crap building – honest) The various markings came from a big pile of 1/72 WW1 decals I was given including some from a Skybirds86 kit (Remember those anyone?) Unlike most bipes this was a doddle to rig because both upper and lower wing are solidly seated. I thread .06mm fishing line through predrilled holes (You did remember to drill all the holes before you glued the model together didn’t you Seeley?) Turnbuckles were added later using a couple of layers of paint.The erk (Or whatever the German equivalent is) was a modified 3D printed U boat crewman with suitable chocks being built up from plastic sheet and the frost effect is a very light dusting of micro balloons.
also on the table


Model of the Month for September 2023 is a 1/35th scale Royal Signals Chevrolet radio truck modelled by Luke Davis (possibly converted from the Tamiya LRDG truck?)

I had the idea of converting the Tamiya LRDG kit to what it was prior to its desert role as a standard GS role , we’ll sort of. As I am building a British tank unit cobbled together after Dunkirk I wanted to build this truck as a wireless vehicle. I also aimed to try my hand at adding scrim netting over disruptive camouflage. There was some conversion work which meant adding two tables for two number 11 radios. The tables were fabricated using plastic card. The radios were from a company called Resicast. I added more wiring and head sets and bits of crew kit.
I retained the kit’s number 11 radio on the side of the truck, just as I thought it was cool . I should think it probably wasn’t fitted there in reality and was only a feature of the LRDG not a signal’s truck. The body work itself would have the two tone disruptive camouflage of the time known as G3 over G4 . To
achieve this I had to spray the body work first before I added the scrim netting. I had seen an advert for a product called “ Paper Shaper”. Which enabled netting or canvas hoods to be moulded over vehicles and then removed without sticking. It sort of works In hindsight I’d use cling film to prevent any sticking if I try this again.
I made the tarps from “green stuff” over brass wire. This also had to be removable to allow painting of the interior. The scrim netting was made from gauze bandages over which thin strips of tissue paper was laid on laced with paper shaper. Once I’d moulded the scrim netting over the tarp hoods and bonnet it was time for paint. G3 & 4 were mixed with tamiya paints. The process of painting was very similar to the flat bed article I did earlier this year so I won’t repeat myself too much here. What I didn’t do in the previous article is weather the painted interior. I wanted to show worn wood from the constant ingress and egress of the crew. I sprayed the wooded body in a suitable wood colour and then used Humbrol masking fluid . Using a torn sponge I dabbed it in the fluid and then gently dabbed it on the wood work where mini hob nailed boots would scuff the paint.
Once that was done I sprayed the darker disruptive green first and then using something called “ silly putty “ which is a kids sort of plastic play dough . I covered the darker paint in the disruptive shape I wanted to portray. The material isn’t sticky but has a kind of dry adhesive feel that adheres. It will However want to droop and pool down wards so it needs to be put on just prior to spraying. I think this material has been adopted by the Ammo brand and called something else. Over the silly putty goes the lighter green . After a filter of oil paint I put the vehicles markings on . Then chipping was done to give the worn look I wanted and then on goes the pre painted netting over the tarps. I decided to add some branches on the truck as added camouflage. I had seen an article on making branches for this reason and the modeller used sea grass sprayed with spray mount over which scatter material was added. I wedged the finished branches in the netting to do as it’s real way intended to break up the vehicles outline.
I like to be grubby, well in making model’s anyway .So after using oils to create faded and stained metal work I sprayed the truck with a pigment mix. This is my favourite bit . With it mixed with white spirit I airbrushed this material over where the truck would kick up dust. It creates a fantastic effect. Though handling can be problematic. After adding separately painted crew kit I wanted to add a map. This truck depicts a wireless truck based on the Dorset coast soon after Dunkirk. As no model manufacturer
would have suitable maps I fished around on eBay and found a genuine 1941 map of Bournemouth and Poole. It didn’t show anything of military consequence accept that it was address in pencil to a Captain in RASC in London.I took this 1/1 map to a printer in Poole and asked him to reduce it to 1/35 scale. ( I’m sure he thought I was a brick short of a full load) Anyway he humoured me and made a great copy you can actually read.

also on the table


Model of the Month for August 2023 is a 1/35th scale South Lebanese Army Tiran 4 (T54/55) by Trevor Griffiths.


Thank you for voting my model as Model of the Month that was the icing on the cake having won a trophy for first place at the recent Romsey model show. I saw a model of this a couple of years back built by a gentleman by the name of Peter Robinson who posted his model on Facebook. This model was always in the back of my mind and decided one day I would build one for myself. The Tamiya model of the Tiran 4 which is in Israeli colours and markings was the basis I needed to build and paint the South Lebanese army version, being Tamiya the kit was an excellent fit as always and
straightforward, I didn’t encounter any build problems. The barrel on the IDF kit was the wrong type for my version and as luck would have it I had the spare one that I needed in my spares box, I also bought the etch brass engine grills and decided to get a set of modelkasten tracks. The only place I found a set was on ebay being sold in Australia, very rare nowadays and not cheap but I wanted them so…..
The other thing I did was to scratch build the bracket for the commanders machine gun as this was placed further back than the IDF version, I left off the search light as I have a book on this tank for reference and the photos show many tanks had them removed. I also bought the tow ropes from Eureka these are really good and you can bend them into pretty much where you want them to go, and I can’t recommend them enough. In fact I tend to buy them for all the tanks I build they are “that good”.
Painting , the grey/blue was a colour the SLA used between the mid 80s to the mid 90s, so as my usual method I used Halfords rattle can grey primer for the base coat then Tamiya blue XF18 medium blue for the main colour followed by XF57 buff for the dusty appearance, tools etc were painted with Vallejo acrylics , storage boxes sourced from my spares box and the tarps are from a company called Red Zebra ( Bovington tank museum sell them but are not cheap items sadly) Again the chain was from the spares box.
The base work was interior poly filler from the tub, some old cat litter (not used) that was sorted into different sizes, I have had this a long time and pressed it into the poly filler while still wet, again the oil drum is a resin accessory I have had a while and just added a tad bit of colour in the corner. The base I picked up a while back at a Yeovil show, I did enjoy making and painting this model and really pleased how it turned out.
also on the table


Model of the Month for July 2023 a super detailed Resicast 1/35th scale Coles Crane on a Leyland Retriever chassis, by Luke Davis


So thanks for voting for my crane. I best now explain what it is and why I made it. Unless you have been living on Mars and are not ahem in your 50s ahem, you would have been aware of Airfix’s Recovery set with its Queen Mary trailer and Amazon Coles crane lorry. Of which I must have had a number of them over the years. I love stuff like this and still have one in my stash as I love the kit and the box art. Coles crane trucks were used as Aircraft and Engineers vehicles so the subject matter is wide and varied and it makes for an interesting model.
So the 1/35 version came about in the early 2000s I can’t remember when exactly but at the time I made
masters for a Belgium Resin manufacturer Resicast . I had already done a Leyland machinery truck and Monty’s Field caravan using the same chassis so I offered to build a Coles crane, as the Retriever also sported a Coles Crane. After ICM released their plastic kit recently the Coles crane body was released as a conversion. During making the master I got to know the Leyland Retriever quite well after a while as when I made the cab, chassis and engine I met Pete Ashby in Oxfordshire where he was renovating one he was going to restore into a machinery truck. He didn’t have a Coles crane version but he put me onto a guy who has three of them in various states of decay.
I went to visit him and found it was like a 1/1 jigsaw puzzle with bits all over the place in the weeds alongside a railway line in a disused railway goods shed. The most up together vehicle came from a nearby canal boat yard used until recently at the time for pulling Canal boats out of the water.
I made this particular model some years ago using popular techniques of the day. I was an avid follower of Verlinden’s style at the time. I painted it in RAF grey . As time went on my skills improved and new techniques came in and I adopted the techniques by Mig Jimenez and the book he wrote “Frequently Asked Questions”. So a couple of years ago I decided to give it a bit of a face lift. I was in the process of building a 1/32 gauge 1 depot railway and any military depot would need a crane now wouldn’t it? I had already used a LOT of model makers licence/ Imagination and created a sort of livery for other depot vehicles, which consisted of a grey body with yellow checkered roofs and white markings similar to RAF markings and a big red number. The livery would not of course been around in wartime and would probably been more akin to post war colours ,but model making is fun and why not! I had seen a yellow top to the crane on a post war model of an Amazon so I decided to adopt this as well.
I also added brass running boards instead of the double wheel mudguards which were a bit flimsy. The truck was resprayed over all with a Tamiya mid grey. And then using sponge and tissue strips and a whole bunch of masking take I masked out the jib and sprayed Tamiya matt yellow. The canvas hood chequered finish was masked with Tamiya tape and sprayed the same way. The weathering techniques were previously described in my article of the Chevrolet flat bed with a series of oil and then pigments to create was worn oily and dirty look. However one technique I don’t think I covered was
the hairspray technique which again I adopted from an article in the AFV magazine. For those of you who are not aware of this finish ,the idea is to create rusted patches of metal or severely scratched areas . To get the finish you spray a rust colour first on the areas where you want the effect to be in this case I used Tamiya Linoleum Brown. I find a lot of the named “rust” colours are far too red in pigment. After the rust is thoroughly dried decant a cheap hairspray from an aerosol can into an air brush and then spray that on top. Leave it to become almost dry before spraying your body colour over it. Then the fun bit starts I use a model railway track rubber and a drop of water and gently rub off the body colour which will scratch and lift areas of the body colour to reveal the rust patches. This has to be done immediately after you have completed the body colour spraying. I also used a cocktail stick, a great tool in scratching the surface to created unsurprisingly scratches!. The trick is less is more and of course a lot of practice. I use Tamiya paints due to their rapid drying characteristics . I do not think Humbrol oils will work for this technique as they dry far too slowly. One thing I do have a habit of doing is if I am out and about and see a particularly weathered truck, plant or
some other transport I take pictures of it for future reference and previous images came in use for this project. By doing this I’ve ended up with quite useful weathering references. The only hassle would be the odd Tutt or sigh I would endure for my long suffering wife if she happened to be in the car with me at the time:) I had seen several cranes in the past kicking about Poole docks and various industrial estates and they also got photographed and I would look over them as well. I noticed the blocks of wood, chain and tools stashed on them which I adopted on this model which to me gave it some life as well as a girls trophy bra hanging off the front radiator bumper :
also on the table


Model of the Month for June 2023 is a 1/48th (?) scale AEW Skyraider by Ian Domeney
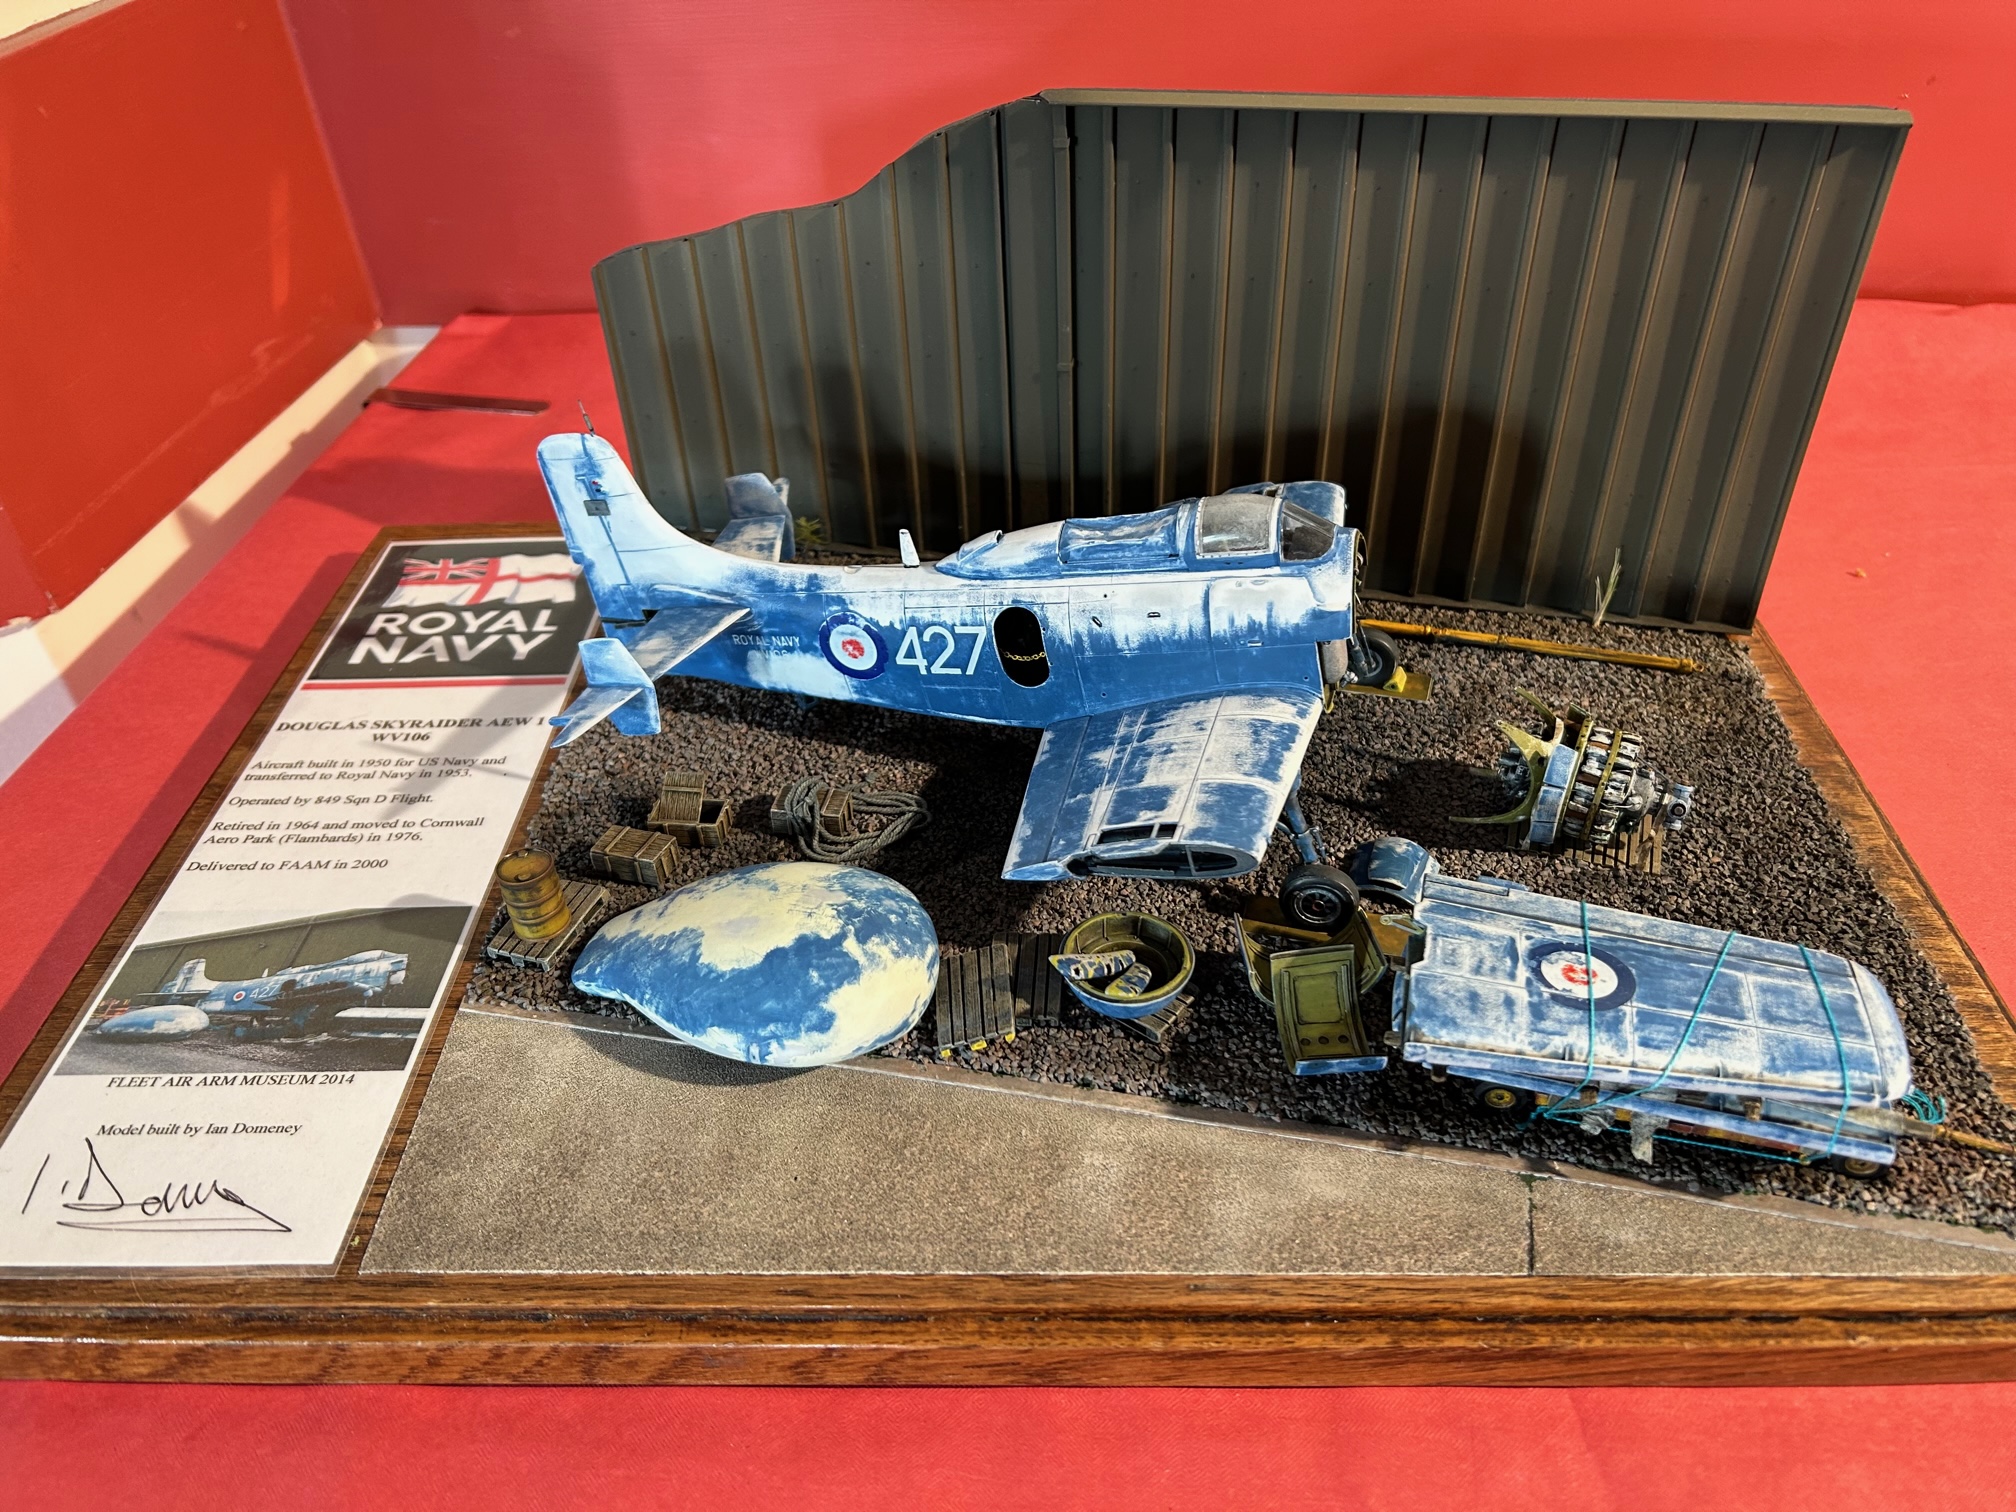
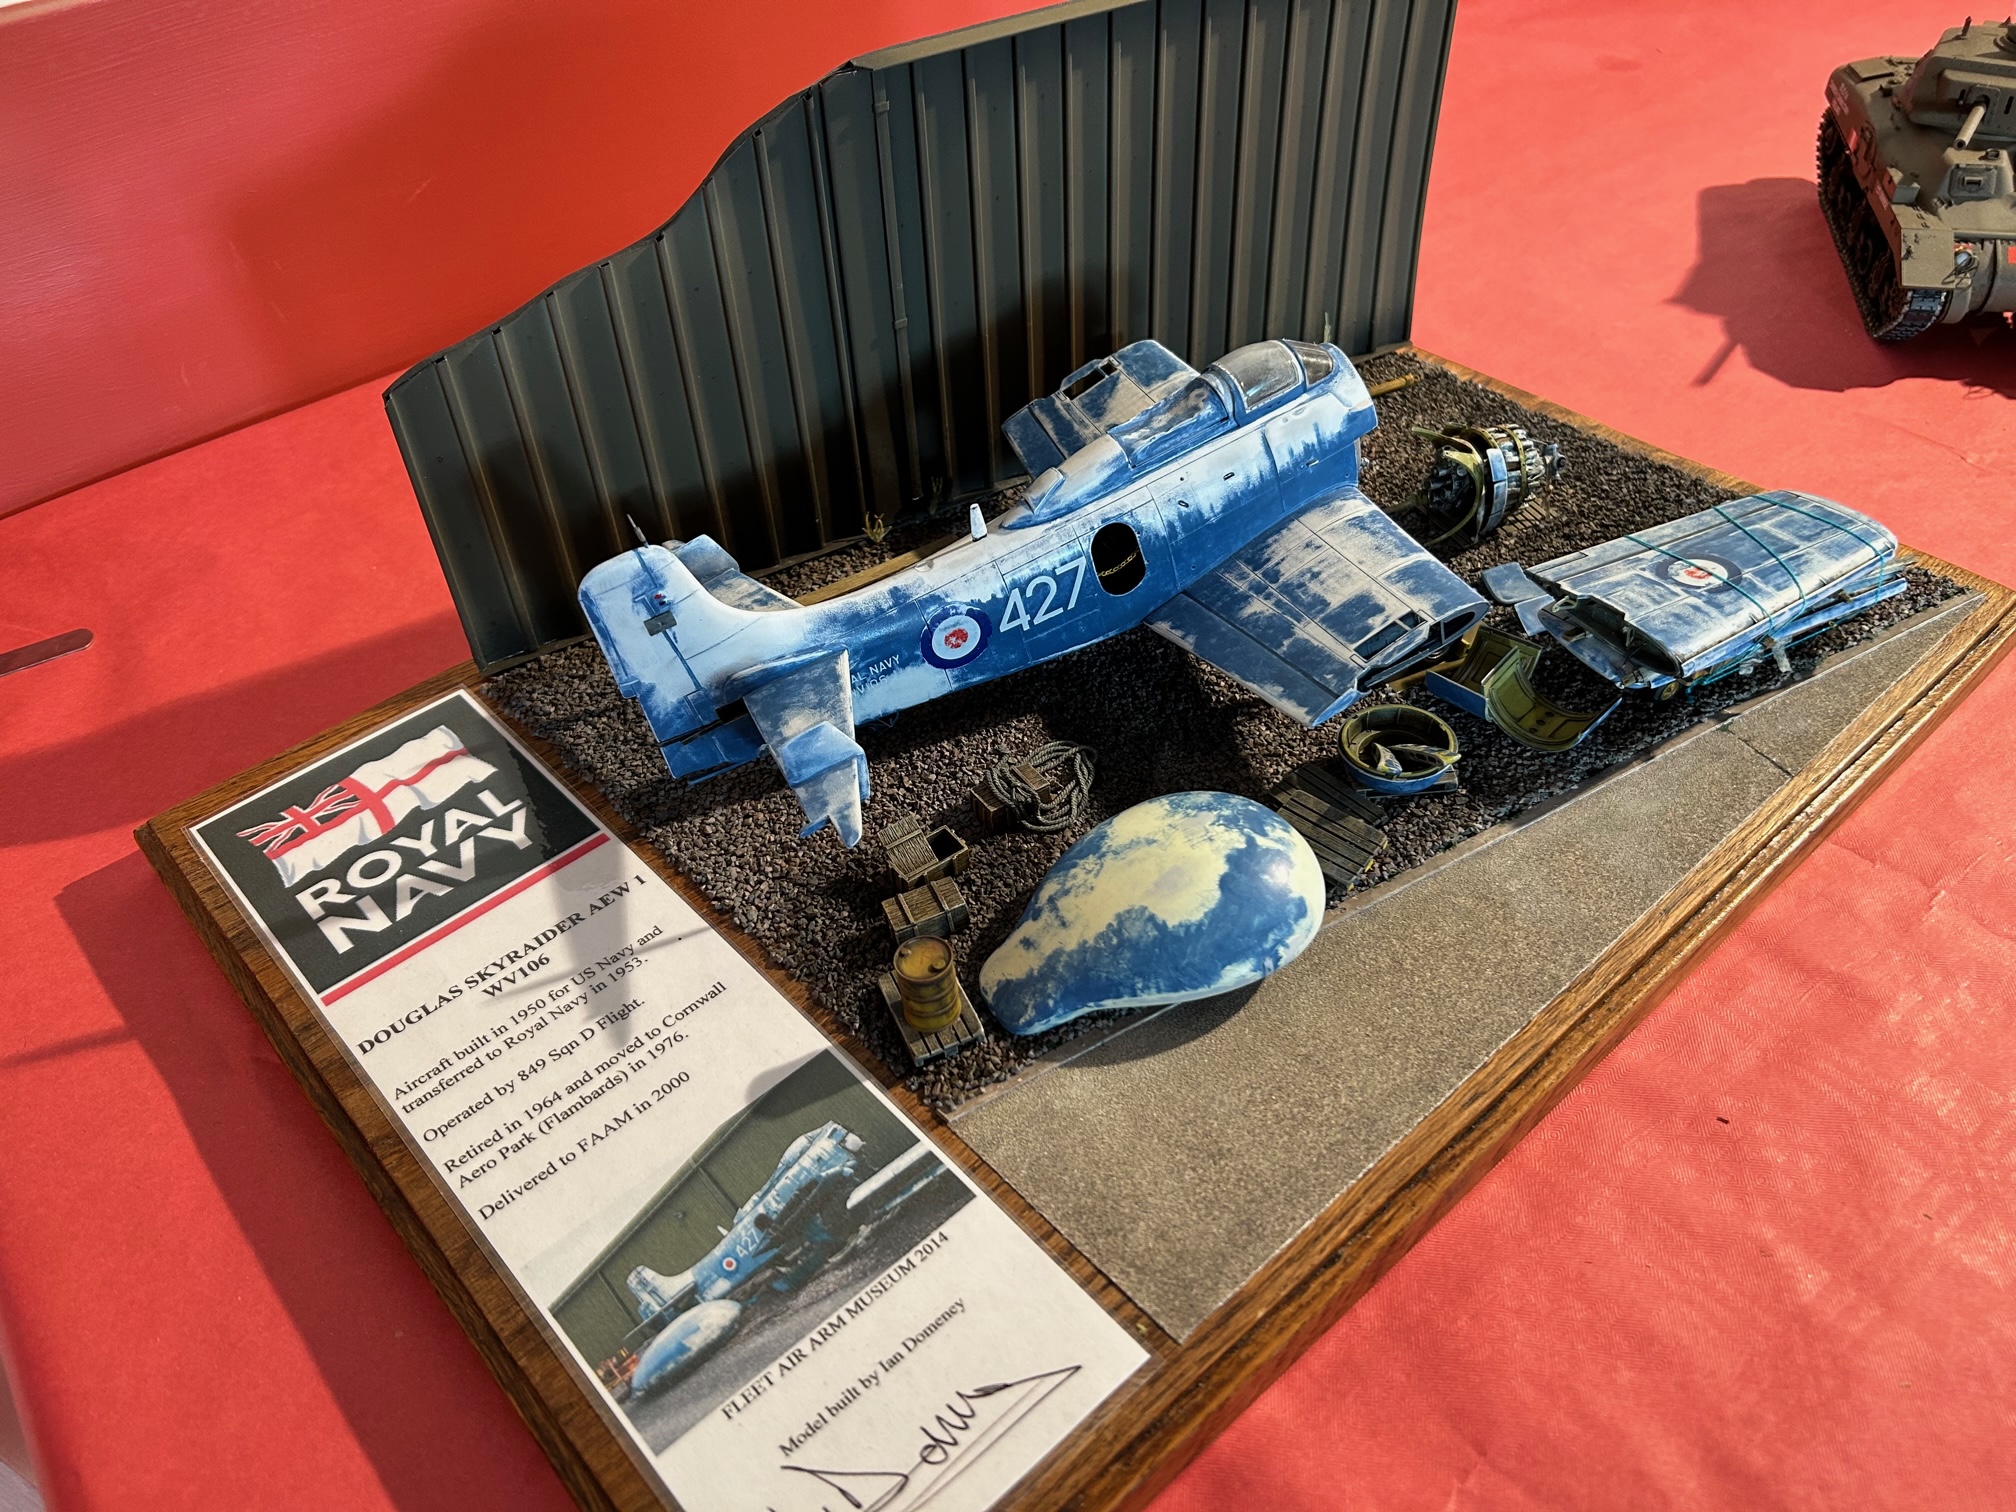
Royal Navy SKYRAIDER WV106 has been languishing outside the Cobham Hall at the Fleet Air Arm
Museum Yeovilton for many years. It was originally built for the US Navy in 1950 but was transferred to the
Royal Navy in 1953 where is was operated by 849 Squadron D Flight until its retirement in 1964. In 1976 it
moved from storage to Cornwall Aero Park (Flambards). Finally in 2000 it was delivered to FAAM where it
has been open to the elements and its condition is slowly deteriorating. I took some photographs of the aircraft a number of years ago and used them as the basis of my build.
Basic kit AD-4W FLEET EYE (AMT/ERTL/ESCI in 1/48 scale)
Replacement engine RESIN CURTIS WRIGHT R-3350 DUPLEX CYCLONE (ENGINES and THINGS)
Wing fold details PHOTO ETCH (AIRWAVES)
Pallets RESIN (HAULER) Oil Drum RESIN (ANYSCALE) Wooden boxes RESIN (MINIMALI)
Although the build has taken a rather long time to complete with many interruptions and distractions along the way, I really enjoyed my first dip into the diorama water. I’m particularly pleased with the scratch built trolley and loved forming the engine mounting from the plastic cap of a deodorant can
Also on the table


my apologies there was also a nice card model of a two gun heavy warship turret but I seem to have missed it


Is this a Crossley BVG Kegresse? I’m told by the modeller that its a Citroen Kegresse.

